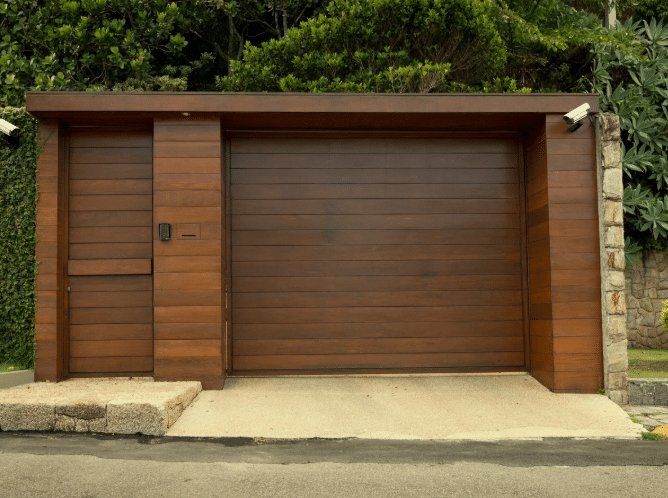
Flush Mount Garage Door Installation: What to Expect

Having a Flush Mount Garage Door installed is one of the most impactful upgrades you can make to your home’s exterior. If you have spent any time looking at photos of Flush Mount Doors, you already know how much the right door transforms a home. But if you have never been through the process before, it is natural to wonder what actually happens on installation day, how long it takes, and what you need to do to prepare.

Knowing what to expect ahead of time helps the project go smoothly and gives you confidence that everything is being done correctly. This guide walks you through the full Flush Mount Garage Door installation process from start to finish, so there are no surprises along the way.
Two men discussing plans in office

What Happens Before Installation Day

A successful Flush Mount Garage Door installation starts well before the technician arrives at your home. The preparation phase is just as important as the installation itself, and skipping steps here can lead to delays or complications on the day of the project. Our process before installation day is consistent across all the areas we serve, so every homeowner gets the same level of preparation and attention from start to finish.

Site Assessment and Measurements

Before any door is ordered, a professional should visit your home to assess the garage opening and take precise measurements. Flush Mount Garage Doors require tighter tolerances than standard doors, which means accurate measurements are critical.

  • The technician will measure the width, height, and depth of the rough opening.
  • They will also check the headroom above the opening and the side room on each side of the frame.
  • Any issues with the existing frame, floor level, or structural elements are identified at this stage.

Ordering and Lead Time

Once measurements are confirmed and your door selection is finalized, the door is ordered from the manufacturer. Custom Flush Mount Doors have a production lead time that varies depending on the manufacturer and the complexity of your order.

  • Standard Flush Mount configurations typically have shorter lead times than fully custom orders.
  • Custom colors, specialty finishes, and non-standard dimensions extend production time.
  • Your installer should give you a clear timeline so you can plan accordingly.

Preparing the Garage Opening

Before installation day, there are a few things you can do to make the process as efficient as possible.

  • Clear the area around the garage opening, both inside and outside.
  • Remove any vehicles from the garage so the technician has full access.
  • Make sure the power supply to the existing opener is accessible if it needs to be disconnected.


To make sure you are choosing the right door before scheduling installation, reviewing
Flush Mount Garage Doors: Styles and Design Options can help you finalize your material, finish, and configuration decisions.

The Step-by-Step Installation Process

On installation day, a qualified technician will follow a structured process to remove your existing door, if applicable, and install the new Flush Mount system correctly. Here is what that process typically looks like.

Step One: Removing the Existing Door

If you are replacing an existing garage door, the first task is removing it safely. This includes disconnecting the opener, releasing the spring tension, and dismantling the door panels and hardware.

  • Torsion springs must be fully released before any disassembly begins. This step requires professional handling due to the tension involved.
  • Door panels are removed section by section and set aside for disposal.
  • The existing tracks, brackets, and hardware are evaluated to determine what can be reused and what needs to be replaced.

Step Two: Inspecting and Preparing the Opening

With the old door removed, the technician will inspect the opening carefully before proceeding with the new installation.

  • The frame is checked for squareness, rotation, damage, or any structural issues that need to be addressed.
  • The floor at the base of the opening is inspected to ensure the threshold seal will sit properly.
  • Any necessary framing repairs or adjustments are completed at this stage before the new hardware goes in.

Step Three: Installing the Track System

The track system is the foundation of how your Flush Mount Garage Door operates. Proper track installation is essential for smooth, reliable performance.

  • Vertical tracks are secured to the door frame on each side of the opening.
  • Horizontal tracks extend from the vertical tracks back into the garage ceiling space.
  • Track alignment is checked carefully, as even minor misalignment causes operational problems down the line.

Step Four: Hanging the Door Panels

With the track system in place, the door panels are installed section by section starting from the bottom and working upward.

  • Each panel is connected to the next with hinges that allow the door to flex as it travels along the track.
  • Rollers are attached to each panel and seated into the vertical track.
  • The Flush Mount profile requires precise panel alignment to maintain the clean, flat appearance the door is known for.

Step Five: Installing the Spring System

The spring system is what counterbalances the weight of the door, making it easy to open and close without putting strain on the opener motor.

  • Torsion springs are the most common type used with Flush Mount Garage Doors and are mounted on a shaft above the door opening.
  • Spring tension is calibrated to match the exact weight of the door. This is a critical step that must be performed by a trained technician.
  • Incorrectly tensioned springs put stress on every component in the system and create a safety risk.

Step Six: Connecting and Testing the Opener

Once the door is fully hung and the spring system is set, the opener is connected and tested.

  • The opener is mounted to the ceiling and connected to the drive rail.
  • The safety reversal system is tested to confirm the door reverses properly when it detects an obstruction.
  • Travel limits are set so the door opens and closes to the correct positions without over-traveling.

What a Quality Installation Includes

Not every installation is created equal. Knowing what a thorough, professional installation should include helps you evaluate the quality of the work being done and ask the right questions.

Balance Testing

A properly balanced door is one of the clearest indicators of a quality installation. The technician should test the door balance before considering the job complete.

  • The opener is disconnected and the door is lifted manually to the halfway point.
  • A balanced door stays in place without drifting up or dropping down.
  • If the door does not stay level, spring tension is adjusted until it does.

Weatherstripping and Sealing

The final appearance and performance of a Flush Mount Garage Door depend on proper sealing around the entire perimeter.

  • Bottom weatherstrip is installed to seal the gap between the door and the floor.
  • Side and top weatherstripping are fitted to the door frame to prevent drafts and moisture intrusion.
  • The seal is checked visually from both inside and outside to confirm there are no gaps.

Hardware Tightening and Final Adjustments

Before the technician leaves, all hardware should be checked and tightened, and the door should be cycled several times to confirm smooth, consistent operation.

  • All bolts, brackets, and fasteners are inspected and torqued to the correct specification.
  • The door is run through multiple open and close cycles while the technician observes for any irregularities.
  • The opener sensitivity and force settings are fine-tuned if needed.


According to the Door and Access Systems Manufacturers Association’s
garage door safety guidelines, proper installation and safety testing are essential components of every garage door project, not optional extras.

Common Installation Challenges and How They Are Handled

Even well-planned installations can encounter unexpected situations. Knowing what the most common challenges are helps you understand why certain decisions are made on the day of the project.

Out-of-Square Openings

Older homes in particular often have garage openings that are not perfectly square. This can complicate Flush Mount installation because the door profile requires a clean, even fit.

  • Minor variations can often be addressed with shimming and careful hardware adjustment.
  • More significant framing issues may require carpentry work before the door can be installed correctly.
  • Your technician should identify this during the site assessment so it is not a surprise on installation day.

Headroom Limitations

Flush Mount Garage Doors with certain track configurations require adequate headroom above the opening. Garages with low ceilings or obstructions close to the header can create challenges.

  • Low-headroom track hardware is available for spaces where standard clearance is not possible.
  • The technician should assess headroom during the initial site visit and specify the correct hardware configuration in advance.
  • Failing to account for headroom limitations leads to improper door travel and opener issues.

Opener Compatibility

As mentioned in the preparation phase, not every existing opener is compatible with a new Flush Mount Door, particularly if the door is heavier than the previous one.

  • The technician should test the existing opener with the new door before the project is considered complete.
  • If the opener struggles or does not meet the door’s requirements, an upgrade should be discussed before installation day where possible.
  • A mismatched opener shortens the life of both the opener and the door hardware.


For homeowners who want a full picture of what influences the overall investment in a Flush Mount Garage Door,
Are Flush Mount Garage Doors Expensive? covers cost factors including labor, structural work, and opener compatibility in detail.

After Installation: What to Do in the First Few Weeks

The period immediately after installation is important for making sure everything settles and performs as expected. A few simple steps help you catch any issues early.

Observe the First Several Cycles

After installation, pay attention to how the door operates over the first few days of normal use.

  • Listen for any unusual sounds that were not present during the technician’s final test cycles.
  • Watch for any visible gaps in the weatherstripping or areas where the seal does not appear tight.
  • Note whether the door opens and closes smoothly and consistently every time.

Schedule a Follow-Up if Needed

Most reputable installers offer a follow-up service period after installation. Do not hesitate to use it if you notice anything that does not seem right.

  • Minor adjustments to spring tension, travel limits, or hardware alignment are normal after a new door settles.
  • Reaching out early prevents small issues from developing into larger problems.
  • Keep your installation documentation, warranty information, and the installer’s contact details in an accessible place.


Angi’s guide on
how to inspect and maintain your garage door is a helpful reference for homeowners who want a practical checklist to follow in the weeks after a new door is installed. 

For a deeper look at what affects the long-term performance of your new door, How Long Do Flush Mount Garage Doors Actually Last covers durability, maintenance, and lifespan in detail.

Your Installation Deserves an Expert Who Gets It Right the First Time


Your Installation Deserves an Expert Who Gets It Right the First Time

A Flush Mount Garage Door installation done correctly sets your door up for years of reliable, low-maintenance performance. Done poorly, it creates ongoing problems that cost more to address over time than the original installation ever should have.

Flush Mount Door Co. brings professional expertise to every installation we handle, from the initial site assessment through the final balance test and safety check. We work with homeowners across the country to make sure every door goes in right, the first time. Contact us or give us a call to schedule your installation consultation.

Frequently Asked Questions

How long does a Flush Mount Garage Door installation typically take?

Most standard installations are completed in four to eight hours. Projects that involve structural repairs, custom configurations, or opener upgrades may take longer.

Yes. A responsible adult should be present throughout the installation to answer questions, approve any unexpected decisions, and receive a walkthrough of the completed work.

Most professional installers include the removal and disposal of the existing door as part of the installation service. Confirm this is included when you receive your quote.

Torsion springs are mounted above the door on a horizontal shaft and are the preferred system for Flush Mount Doors. Extension springs run along the horizontal tracks and are more common on older or lighter door systems.

Most standard openings are compatible, but headroom, side room, and framing conditions all affect what hardware configuration is needed. A site assessment confirms compatibility before ordering.

Contact your installer right away. Improper balance is a sign that spring tension needs adjustment, which should be handled by a trained technician as soon as possible.

Some settling sounds are normal as hardware finds its position. Grinding, scraping, or loud banging sounds are not normal and should be reported to the installer promptly.

Yes, most Flush Mount Doors can be repainted. Use a paint product compatible with the door material and follow the manufacturer’s preparation and application recommendations.

Your installer should assess opener compatibility during the site visit. As a general guide, most Flush Mount Doors perform well with a half-horsepower or three-quarter-horsepower opener, depending on the door’s size and weight.

Warranties vary by manufacturer and installer. Most door manufacturers offer a warranty on the panel and hardware, while installers typically provide a separate labor warranty. Always ask for warranty details in writing before work begins.